Our Vietnam E-Visa Application Tips for 2026 Travel
In this post, I’ll share our experience applying for a Vietnam e-visa as US citizens for a 2026 Vietnam trip, including how long it took, troubleshooting, and tips.
Unfortunately, applying for a Vietnam visa is not always straight-forward. Some travelers have reported issues with the process. Or even denied entry, as one of our Intentional Travelers members reported to us:

Jedd and I have visited Vietnam a lot in the last decade. Central Vietnam, specifically Hoi An, is one of our favorite destinations to stay long term.
Over the years, we have applied for Vietnam visas in many ways:
– mailing our passports to a Vietnam Embassy in the States,
– applying online for a Visa On Arrival,
– and applying online for multiple Vietnam eVisas.
We hope our tips and Vietnam e-visa instructions for 2026 will help.
TIP: Traveling abroad is much easier when our smartphone stays connected.
If you have our WorldWide Connectivity course (also available inside our Membership), review the modules on eSIM Best Practices and Managing Data Usage to get the most out of your eSIM!
What to Know About the Vietnam E-Visa Application Process

* Access our free Vietnam Destinations guide here *
Where to apply for an E-Visa to Vietnam
You can access the official Vietnam visa application on the Vietnam Immigration Department website.
This gov.vn website is the only official application site.
There are companies that will help you through the application for an additional fee, however, by following the instructions in this post, you can complete the application yourself.
Understand Vietnam Visa Changes Effective August 2023
For our early 2023 Vietnam trips, we used a more clunky version of the electronic visa application. Fortunately, the newer version, as of 2025, is more user-friendly (a little) and has fewer glitches.
During the pandemic and through August 2023, Vietnam visas for US passport holders were limited to 30 days. To stay two months, we left the country after 30 days and reapplied for a second visa. This is no longer necessary.
As of August 2023:
- The new E-visa is extended to 90 days from the previous 30 days
- The E-visa system is now open to all nationalities
Vietnam E Visa Cost
- Single entry (90 days) costs $25, plus processing fee
- Multiple entry (90 days) costs $50, plus processing fee
How long can you stay in Vietnam?
Visitors on the e-visa can stay in Vietnam up to 90 days.
This rule has changed from time to time. Also, residents, diplomats, etc. have a separate process, so this post will be specifically for rules that apply to tourists traveling to Vietnam.
For citizens of the following countries, a visa is not required to enter Vietnam if staying less than 45 days: Brunei, Myanmar, Belarus, Denmark, Finland, France, Germany, Italy, Japan, Norway, Russia, South Korea, Spain, Sweden, The UK, The Philippines, Cambodia, Indonesia, Kyrgyzstan, Laos, Malaysia, Singapore, Thailand, Chile, and Panama.
Multiple Entry means you can come and go from Vietnam to other countries during the three month visa period without needing to reapply for a new visa.
I have not found specific rules about how many times you can reapply for a 90 day visa. Vietnam does not have a digital nomad visa at this time.
When to apply for an E-Visa to Vietnam
It’s important to apply well in advance for an eVisa. You will not be able to board a flight to Vietnam without a valid visa.
Do not wait until the last minute. I have been submitting our applications about 2 months before travel, just to be sure.
Officially, the Vietnam evisa processing time takes 3-5 working days, however, this can potentially take longer if anything needs extra verification. Factoring in weekends, evisa turnover could easily take a week.
What about Vietnam VOA (visa on arrival)?
The Visas On Arrival option – technically it’s a Landing Approval Letter – is something we used before the pandemic, then it was paused.
In cases where you’re ineligible or have trouble with the e-visa process, you may be able to apply for a Landing Approval Letter through an agent in Vietnam, print out the letter, and proceed to the visa counter at the airport to receive your actual visa sticker, which is another $25 USD.
It costs more and still requires advanced paperwork, so for the eVisa is definitely a better way to go for most travelers.
2026 Vietnam E-Visa Application Guide
Be prepared to fill out the application form in one sitting. The website warns: “If there is any missing or incorrect/unidentified information, your application will not be accepted.”
Also noted on the application: ” the application fee is not refunded if the application for e-Visa of Viet Nam is denied.”
Mistakes on the visa could prevent you from boarding your flight or be costly to rectify at immigration.
I recommend completing the application on a computer rather than a mobile device. It can be doable on an iPad or tablet, but some aspects of the form could be trickier to manage.
Here is what you should have prepared:
Photo of your face with white background – It’s fine to take a selfie or crop your face from a recent photo. It just needs to meet the following requirements:
– white background
– head shot, facing straight forward
– not wearing glasses
They specify 4x6cm dimensions of the image – about 50% taller than it is wide for digital images. The image file also needs to be under 2 MB.
Image of your passport data page – You can either scan your passport or simply take a picture with your phone. Be sure there’s not glare so that your name, numbers, and photo can be seen clearly.
Be sure to label these images or save them somewhere that’s easy to find on your computer, such as your Desktop.
Your estimated arrival and departure dates – Be mindful that the Arrival Date and Stay Duration you enter in the application will automatically set your approved visa period. Make sure that your trip dates will fall within the validity period of your e-visa.
Remember that the visa is up to 90 days, so give yourself wiggle room when possible. You can arrive AFTER the entry date on your eVisa. And you can depart BEFORE the departure date on your eVisa.
You just can’t arrive BEFORE or stay AFTER the dates on your visa (although we did accidentally overstay by one day once, but I don’t recommend trying!).
Step 1: Starting the application
Open the online application at the Vietnam Immigration website by follow the links for “personally apply for E-Visa” or “for outside Vietnam foreigners”. (Switch button on the site to English if needed.)
This should open an introductory instruction page. It overviews the three steps:
1) Fulfill required information
2) Pay E-Visa fee
3) Check result / Print E-Visa
Click the checkbox to confirm that you have read instructions. Then click the “Next” button to go to the actual application form.
Step 2: Upload images
At the top of application under the label Foreigner’s Images is where you’ll upload your Portrait and Passport Page images. You can click on the sample photo (or “Choose File” underneath it).
This should trigger the Finder on your computer to open so you can search and select from the saved images on your device.
Once you’ve selected an image, it should appear on the application in the place of the sample.
The application now compares your recent portrait to the passport image automatically. Ours only showed a 70% match (lol), but that passes.
Step 3: Complete Personal Information
As mentioned, triple check for typos when completing the form. Mistakes can cost you time and money.
It’s laid out in multiple columns so it can sometimes be easy to miss an option on the right side.
Your name should match what is on your passport. Note that date of birth in Vietnam is written with the day first, followed by month. For place of birth, we put “[City name], USA”.
Some travelers are surprised that Religion is a required field. If you don’t ascribe to a religion, you can answer NONE. The Communist government requires that buddhist monks and other ministries be registered. Otherwise it’s not likely that your Religion will matter, unless you happen to be visiting during a period when a religious organization is actively challenging Communist authority.
We always put Christian and have never been asked about it.
For Identity card, I used my passport number. Passport number is requested later in the form as well.
Be sure to choose from Single Entry or Multiple Entry. If there’s any chance you’ll need to leave and come back to Vietnam during the 90 days, go with Multiple Entry.
Set eVisa validity on or before your arrival date. *See notes above.
Make sure the passport information matches the passport page image you uploaded exactly. Issuing Authority / Place of issue is the country your passport is from.
Permanent Residential Address was prefilled with “United States of America” so I update it with our street, state, zip code. I duplicated the same address for Contact Address in the field below.
Vietnam does not currently have any digital nomad or remote work visa. All of our clients are in the States, we do not earn income nor replace jobs from Vietnamese people, so the purpose of visiting has always been “tourist”.
Unless a company, NGO, or other group is responsible for your stay, skip the hosting organization section. If you are traveling Vietnam with a tour, ask the tour operator if you should use their information in this section.
As mentioned above, the Intended Date of Entry and stay duration will automatically set your approved visa period. Select these dates based on when you want your visa to start and end.
*See notes above.
For example, our flights were scheduled to arrive on January 12th and depart 87 days later. However, to give us wiggle room just in case things change, I selected January 11th and the full 90 days.
Presumably it would be fine if your selected Entry and Exit Checkpoints change at some point. However, it’s important to note that the evisa is only accepted through the official airports and border points listed in the dropdown menu here.
For example, DaLat airport (DLI) is not on the list. You might find a flight from Thailand to DaLat, but apparently they are not equipped to receive visitors with the e-visa.
Since we’re traveling to multiple destinations, I chose our first accommodations for the Temporary residential address. I copied and pasted their address from Google Maps. This is also a quick way to find the province, as it’s included in the address on Google Maps.
If you’re not sure of the ward/commune, that should also show within the address when you’re on Google Maps. Ours actually showed two so apparently either is fine!

For phone number in Vietnam, we have done two things in the past: entered the Vietnamese phone number of our first accommodations, or entered our own international phone number if we’d have access to it abroad.
“Committed to declare temporary residence according to the provisions of Vietnameses laws” didn’t make sense so at first I left it unchecked. Apparently this checkbox required to complete the application, though.
Next you’ll report any visits to Vietnam from within the past year. Estimate your trip expenses – for us it’s about $500 per month for living expenses, plus some potential splurges.
Travel insurance that covers Covid-19 treatment with a minimum coverage of $10,000 was required for Vietnam after the pandemic, but this language has been removed. We highly recommended always using travel medical insurance in Vietnam and to select Yes here.
We have used Safety Wing and another medical plans through InsureMyTrip for travel insurance in Vietnam, so that’s what I write in under Specify.
Step 4: Triple check before continuing
Once you click the Next button, you’ll have one more chance to review and edit your information.
This is a big upgrade from earlier version of the application, where the “Review Application Form” button was essentially the Submit button.
Triple check before clicking Next at the bottom of the review page.
Tip: The Vietnam e-visa forms use Catpcha verification, but the numbers you’re supposed to type are not always clear. Feel free to click the arrows icon next to it to renew the Captcha code until there’s one you can clearly read.
A pop up screen will display if your form was completed, showing you a registration number. You can use the registration code later to look up the status of your application. Write it down or take a screenshot.

I received an email from Vietnam Immigration Department (no-reply[at]immigration.gov.vn) not immediately but several minutes after completing the form. This email also includes the registration code you need to check the status of your application and the process to pay, in case you miss that step on the website.
Once I clicked “Confirm” on the pop up screen above, it took me to Page 3 of the application process. At the bottom should be two buttons: “Cancel” or “Payment.”
On Page 3, be sure to check the visa validity dates are what you expected. Your arrival and departure must fall within the dates listed.
If there are any other issues, do not proceed to payment. Fix any dates or inaccuracies first. Otherwise, you can proceed via the “Payment” button at the bottom.
Note that the Vietnam visa application fee is non-refundable “under any circumstances, as it is a processing fee and does not depend on whether the visa is granted or denied”.
Other terms listed before payment:
Updating the payment status for the visa application may take up to 2 hours due to technical processing time or system connectivity. You should check the application results and payment status (as mentioned in item 1) before reapplying. If you submit and pay for a second application that is the same as the previous one, the Immigration Department will assume these are two separate applications, and the previous fee will not be refunded. If both applications are approved, they will be equally valid.
If your information is incomplete or invalid, you will be required to provide additional information or may be denied based on the policies of the Vietnamese Immigration Department. If you need to resubmit information, the processing time will begin when you submit the valid information. In this case, please pay attention to your entry date.
Step 5: Pay for the e-visa
Here’s another spot where things can get tricky. If your payment fails to go through, you will not have a second try. You might need to start over and fill out the application form to get a new registration number before attempting to pay again.
You may want to contact your bank at home before making the payment. Verify that they won’t prevent transactions for an online purchase with a Vietnamese company.
Our payments failed with Chase Bank credit cards. I think because the foreign transaction triggers Chase’s fraud detection.
I had success with our Capitol One card. This still triggered an extra verification step from the bank but we were able to process it on the site without the transaction failing.
Since we were abroad in Thailand when applying last time, we had taken steps to receive verification texts from our bank internationally. (This is one of the strategies I teach in my WorldWide Connectivity course.)

At first, the website application did not allow me to continue past the submission page to make a payment, here’s how I got to the payment processor:
- Followed the link in the confirmation email to check the status of my application
- Entered my registration code, email, and date of birth
- Clicked the icon at the bottom of my status update, which looks like:
“Click here 🉑 to edit and pay visa fee for processing” - After taking a moment to load, this opened up my application for editing again. I could then select the “Payment” button at the bottom of the review page.
The payment is done through Vietcom Bank. You can select to pay either by ATM card (debit) or credit card.
You’ll select from Visa, Mastercard, American Express, or JCB. Then fill out the card information and your billing address.
Once again, it’s important to triple check your information. If your address or name doesn’t match what your bank has on file for your card, it could cause the transaction to fail and you may have to start the entire application process over!
Here it brings up a series of warnings: check your info carefully, evisa result will not be emailed, print and bring the evisa, fee is nonrefundable even if you make an error…
See below for the full text.
Click “I agree” on the pop up then Continue to finalize payment.
2023 results: I clicked green “Continue” button, saw the spinning wheel like it was working, then my information was still there. I clicked Continue once more and this time, there was a verification pop up from my bank.
(This is where I previously got stuck when trying to pay with a Chase card.)
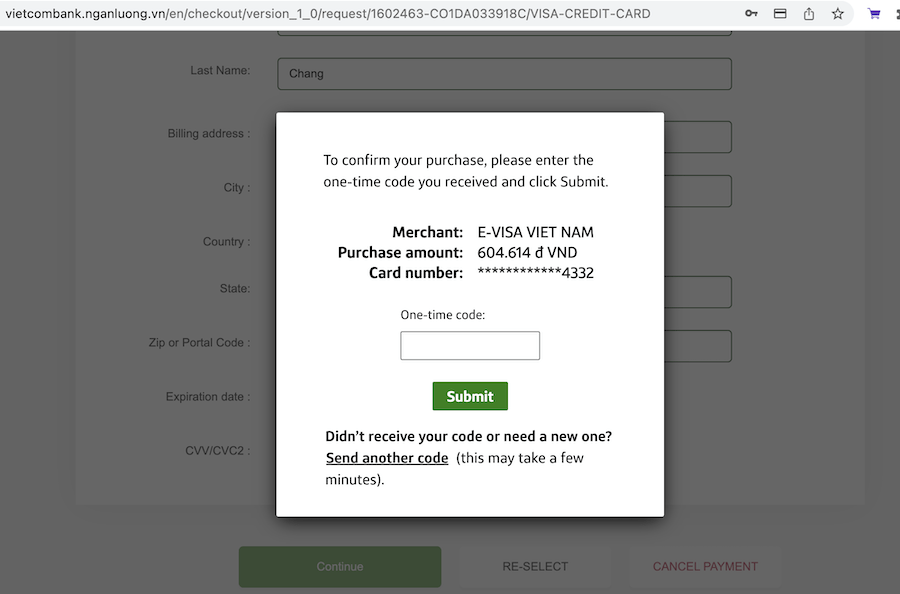
So I found the verification code in my text messages and submitted via the pop up from Capital One. This may look different for you, depending on your bank.
I waited a moment while it said “connecting” at the very bottom of the page. Then the screen redirected to a confirmation: “Payment Success! Click here to query and verify application status”.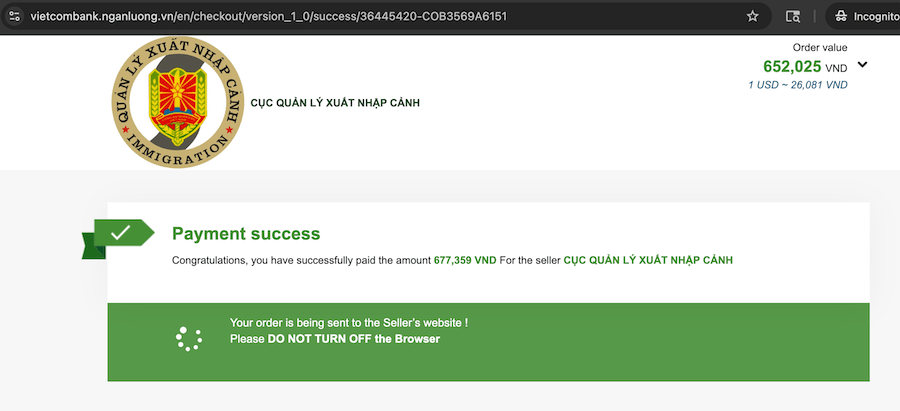
I received an email confirmation from Vietcom Bank Payment Gateway showing my successful visa payment and reiterating some instructions.
2026 results: The CapitalOne verification seemed to worked fine for both of us. However, only one payment went through successfully the first time. On the other one (same credit card), my screen redirected to:
“This site can’t be reached – vietcombank.nganluong.vn took too long to respond.”
I clicked back in the browser and it let me click Continue again, but got the spinning wheel that never stopped. So with the links in my email, I tried to login with the given temporary password, click the link in my email for “list of declared profiles”, reopen my original application, re-enter the Captcha, and got to the payment page again.
But it told me “The payment failed, please recreate profile and retry payment” then redirected to start the application over!
There is supposed to be a small transaction fee. I noticed it listed my payment at first as 1207000₫ VND but later showed the visa cost as 1252599₫ Vietnamese Dong. It’s a difference of about $2.
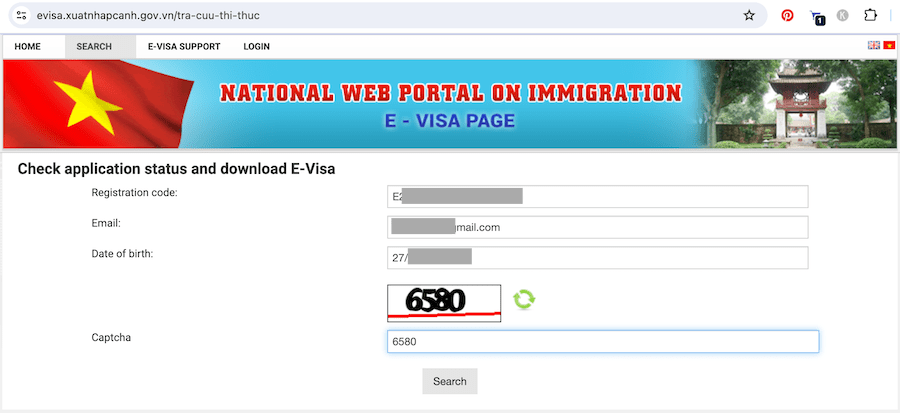
Step 6: Check your Vietnam E Visa Status
You may or may not receive an email when your application is approved. For this reason, you can check your status via the application status webpage provided in the confirmation email.
It usually takes 3-5 business days, but could be longer.
I applied mid-day on Thursday (North America time) and it was still processing when I checked my visa application status via the website on Monday and Tuesday (which would be end of the third business day in Vietnam).
![]()
![]()
Tip: Remember on these forms you can refresh the Captcha number until there’s one you can clearly read for verification.
The morning of the sixth day after I applied – on the fourth business day in Vietnam – my visa was granted. (It was the third business day for Jedd’s application.) My status online changed to:
Application status: Granted visa
Visa number:—
Allowed to enter Viet Nam from11/01/2024 To 10/04/2024
Click here ⬇️ print visa
When I clicked on the down arrow icon, it opened the visa document. For whatever reason, I was not successful in downloading the document to my desktop. Instead, I selected print and “Print as PDF“, which allowed me to save the visa to my desktop as a PDF file and print it later.
At first, I did not receive any email when the visa was issued, however, it did come eventually. The subject line was “E – visa Vietnam: Announcement result” and it directed me to the status webpage.
Step 7: Print your E-Visa and Bring It To Airport
If you’re wondering whether you can show a digital version of the e-visa for Vietnam from your phone or tablet, I would not risk it. Instructions are clear that it should be printed.
The visa, which you download from the status webpage, is a single page document. It has the red and yellow seal of Viet Nam toward the top and a QR code at the bottom with your name, passport, and dates of valid entry.
The visa does not need to be printed in color. Black and white has always been fine when we’ve done it.
Your airline should ask for your visa confirmation, most often at the check-in counter, before boarding your flight to Vietnam.
You will also need to show it at the Immigration desk upon arriving in Vietnam.
Tip: I like to pack a file folder in my carry on that I can easily access with our printed visas, copies of passports, onward flight info, hotel address, etc.
Vietnam e-Visa Warnings Before Payment
These instructions and warnings pop up during the payment process, and I thought it would be helpful to have them for reference here:
Visa is an IMPORTANT PROCEDURE IN THE IMMIGRATION PROCESS, you need to carefully check the application information before submitting and note the following regulations:
Notice: Registration code will be sent via your registered email, therefore, please kindly provide the correct email, and take full responsibility for the provided information.
1. According to regulations, your e-Visa result will NOT BE PROVIDED VIA EMAIL. To check your e-Visa result, follow these steps:
• Step 1: Visit the page: https://evisa.gov.vn/e-visa/search
• Step 2: Provide the required information, including registration code, email and date of birth to check.
• Step 3: Download, print out your e-Visa and bring it along your entry.2. According to Article 5 at Resolution 30/2016/QH14 of the Socialist Republic of Vietnam, the e-Visa fee once submitted is NON-REFUNDABLE BY ANY REASONS as the fee is for processing of the application and is NOT DEPENDENT ON EITHER GRANTING OR REJECTION of visa.3. The e-Visa fee payment status update MAY TAKE UP TO 2 HOURS due to technical reasons/network delays. You need to check your APPLICATION RESULT and PAYMENT RESULT (according to section 1) before RE- APPLYING. If you submit and pay for THE SECOND APPLICATION, which is the same as the previous application, THE IMMIGRATION DEPARTMENT WILL PRESUME THAT THESE ARE TWO DIFFERENT APPLICATIONS and that the previous fee will NOT BE REFUNDED. If both applications are granted a Visa, they are equal use.4. If your information is not sufficient and valid, you will be requested to provide further information or you can be rejected based on the policy of the Vietnam Immigration Department. When you have to provide the information again, the processing time will be started when you resubmit the VALID information. In this case, take note of the time of entry.5. The e-Visa is normally processed within 03 working days (*) after the e-Visa fee has been paid with sufficient and valid information.
6. In case of the application to be further verified by The Ministry of Public Security, you will receive the result from 03 to 15 working days (*)
7. For e-Visa support, please check for more information at https://evisa.gov.vn/faq or directly contact Vietnam Immigration Department at: https://evisa.gov.vn/support
(*) The working days exclude the weekend and national public holidays.If you continue to pay, you confirm that you have read and agreed the visa regulations of Vietnam Immigration Department.
I hope this guide to Vietnam E Visa application has been helpful to you. Let us know if you have additional questions or suggestions to add from your own experience.
Check out our other Vietnam travel resources:
–Suggested Vietnam Itineraries: 10+ Days in Vietnam
–A budget guide to Hoi An Vietnam
–A budget guide to Ninh Binh
–A budget guide to Hue
–A budget guide to Hanoi
–A budget guide to Mai Chau Vietnam
–Central Vietnam Destinations and Itinerary


It’s very helpful, thank you. Your instructions are perfect, I have just followed them and got processing
Great, thank you for the feedback and enjoy your trip to Vietnam!
Super helpful article.
Question:
Suppose we are in Vtnm for almost 90 days on an evisa, and plan to do a “visa run”, and then return to Vtnm for another 90 days on another evisa. We would like to spend the least amount of days possible outside of Vtnm before we return to Vietnam. In case we apply for the second evisa while outside of Vietnam, it seems that we would need to stay outside vtnm for at least 4 days, and maybe as much as a week.
Can we apply for the second evisa before exiting Vtnm at the end of the first 90 day period? Or must we wait until exiting Vtnm before we apply for the next evisa. I mean, it seems that (1) in case of apply while still in Vtnm, possession of a current evisa might interfere with the process of getting approved for the next evisa, depending on the protocols of the immigration dept, and (2) assuming that the second evisa does get approved before we would depart Vtnm at the end of the first 90 days, it seems that the existence of that data in their computers might cause problems at the border when we try to exit using the first evisa.
Do you know what to do in this situation? Thank you!
Hi Stan. I’ve only seen speculation around travel forums that applying for a second evisa while still in Vietnam could potentially void the current visa, or at least cause some problems at the border. My recommendation would definitely be to NOT risk it, in other words: wait to reapply until you’ve departed Vietnam. To be increase the likelihood that you won’t have to readjust your travel, plan a minimum 5 *business* day visa run (i.e. Monday through Friday, or Tuesday through Tuesday). You may also be able to find Vietnamese border run companies who will (for a fee) drive you to an approved border, help you fill out the application on the other side, and drive you back – which may help cut down on turnaround time, I’m not sure.