How to Use Apple AirTags For Tracking Luggage When Traveling
With growing concerns over lost luggage and delays at airports, we decided it was time to try Apple AirTags as a luggage locator or tracking device on our trips.
In this Apple AirTag review for travel, we go over our personal experience with Apple AirTag luggage tracking on various flights. We also share important things to know about AirTags when traveling, how to set them up in an app to track luggage, and other handy ways to use the devices.
The promise: Using an Apple AirTag, you’ll never lose track of your luggage again.
The test: We’ll put two Apple AirTags in each of our checked-in luggage and track them as we travel from Oregon —> Montreal, Canada —> Frankfurt, Germany (connection) —> Florence, Italy.
Final result: UPDATE: Test, review, and final thoughts about using AirTags from our trip: Montreal, Canada —> Frankfurt, Germany (connection) —> Florence, Italy. Click to read about these flights and if our bags made it.
Disclosure: This free article contains affiliate links. If you make a purchase after clicking one of these links, we may earn a small commission at no additional cost to you. As an Amazon Associate, we earn from qualifying purchases. Your support helps us continue to provide helpful, free content for you.
Updated: May 2025. Originally published: August 2022.
Table of Contents
They Lost Our Luggage How Many Times?
There’s nothing like starting an international trip only to find that your luggage has gone missing.
There have been a couple times where our luggage has been lost in transit and not returned to us for more than a week.
Not only were we without clothing, shoes, toiletries, and other essentials for our trip, we soon found out that some items are surprisingly difficult to replace. Like decent running shoes in Italy.
Each day we contacted the airlines. We couldn’t get a straight answer of where our bags were or when we would be getting them back.
We then had to work with the airlines and our credit card company to figure out how to get reimbursed for items we needed to purchase, which resulted in even more phone calls and paperwork. And because we were on the move, trying to coordinate where and when to deliver our bags was also challenging.
It’s not the way you want to start a trip.
For some travelers, the experience of lost or delayed baggage causes them to abandon checking in luggage all together and join Team Carry On.
For Michelle and I, Team Carry On is not usually an option.
![]()
![]()
Benefits of Checked Luggage
We tend to stay in one place for a while. Checking in a bag allows us to bring items that will make our longer stay more enjoyable.
- This can include extra clothing for varying weather or different activities. Also, Jedd likes to bring his own kitchen knives for cooking, which cannot go through TSA.
- Checked luggage also affords you some space for souvenirs to bring back.
- Plus, it’s less burdensome not carrying everything with you as you transit through the airport and make flight connections.
Benefits of Carrying On Luggage
I understand the appeal of only using carry ons when traveling. As long as you have your boarding pass, you can avoid a couple of pain points waiting for your luggage.
- You don’t have to drop off suitcases with a gate agent before flying.
- You don’t need to wait for luggage to arrive afterward at baggage claim.
- You know exactly where your carry ons are because they are always with you.
- You can save money if there’s a checked bag fee.
Check out our travel bag recommendations here >
The Checked Luggage Problem and Possible Solution
In a perfect world, airlines would not lose baggage, period. Since this cannot be guaranteed, the next best thing is to mitigate this potentially annoying issue with better planning.
Expect that your checked bag may not arrive with you and plan from there.
Here’s our personal solution:
- We’ll each carry on our laptop backpacks.
- Additionally, we’ll carry on a duffel bag with essential, hard-to-replace items.
- We’ll each have one check-in bag with an Apple AirTag inside.
We recognize that having an AirTag doesn’t prevent our bags from getting lost, but at least we’ll know where our checked luggage is.
Once we arrive to our destination, we can know immediately if our bags didn’t arrive. Then we can head straight to a baggage agent and get the lost luggage reporting process started right away. This means less waiting in line if others on our flight have the same issue.
We can communicate our bag’s location to the airlines, which can potentially speed up the process of getting our luggage back. Check out a story of this exact scenario.
Finally, rather than waiting in limbo and calling the airline for an ETA each day, we can also use Air Tags as a personal tracker for luggage while being returned to us.
We’ll see when it finally arrives to the airport, when it goes out for delivery, and how far away the delivery driver is from where we’re staying. Previously, we could only guess when we’d have our clothing back, which makes it difficult to know how much to shop for in the meantime.
What are Apple AirTags used for?
In April 2021, Apple introduced a new product called AirTags. The premise was simple: use this device as a tool to geo-locate anything you want.*
The main user stories Apple advertised were items that often get lost like keys, bags, and other valuable items.
You simply pair an AirTag to your Apple ID and personal phone (or other device). Then attach that Air Tag with the item you want to track.
For example, you can put the AirTag in a specially designed holder and attach it to a key chain. If you get separated from your keys, you open up an app on your phone that helps you locate the Air Tag.
*It should be noted that, like all technology, terrible people have used this technology for malicious purposes and unintended uses (like tracking people, cars, etc…). While the risk of someone using an AirTag against you is rare, it’s important to to be aware of. Thankfully Apple has built in some safe guards and notifications.
Learn more here about what to do if you get an unwanted AirTag tracking alert.
The Apple AirTag Device
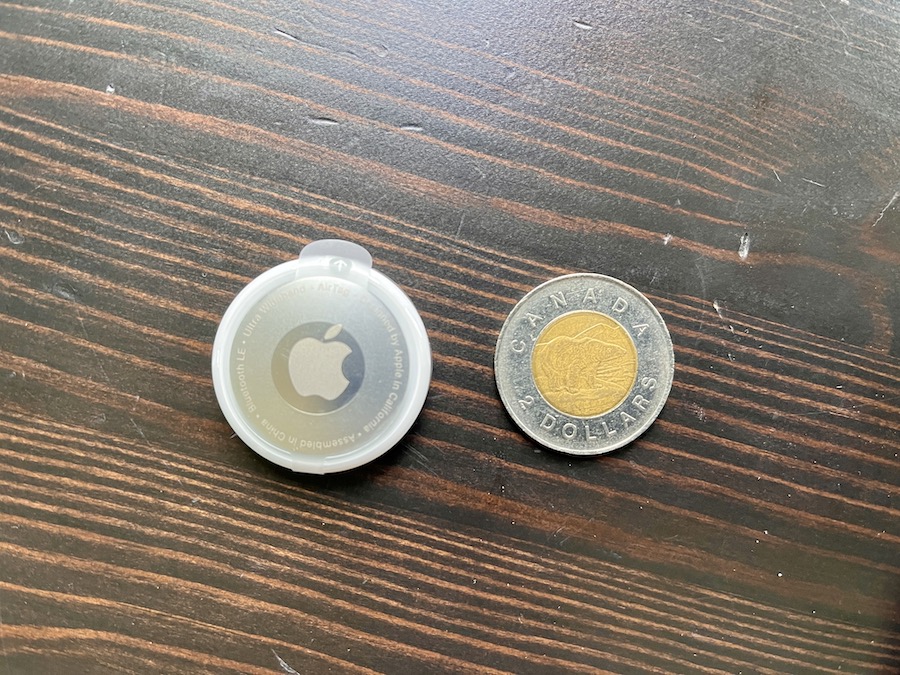
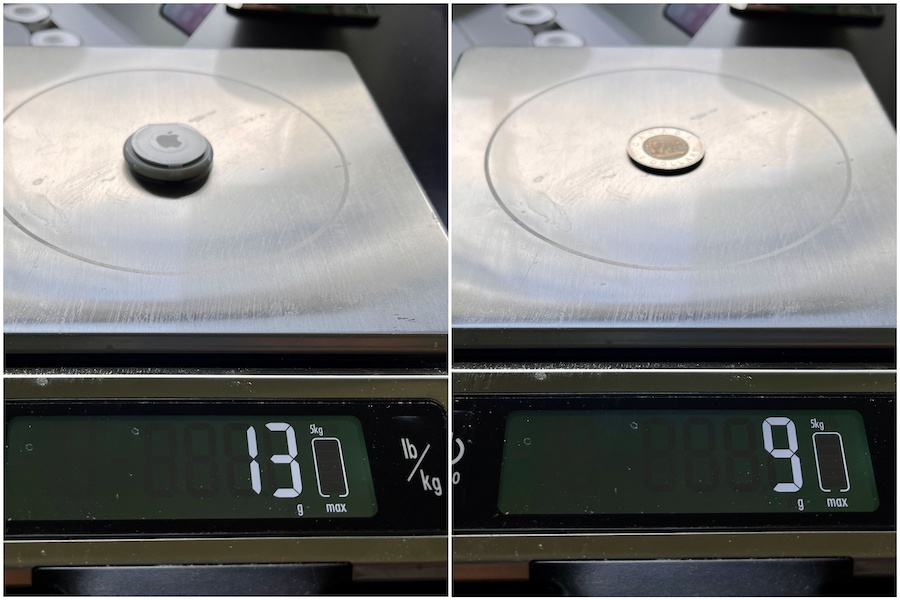
Each Apple AirTag is small, about the size of a Canadian 2 dollar (we’re heading to Canada soon) and weighs about 13 grams.
Thankfully, it has a built in GPS tracker because the AirTag is small enough that it could easily get lost itself. As with most Apple products, to be useful, you probably need some sort of accessory.
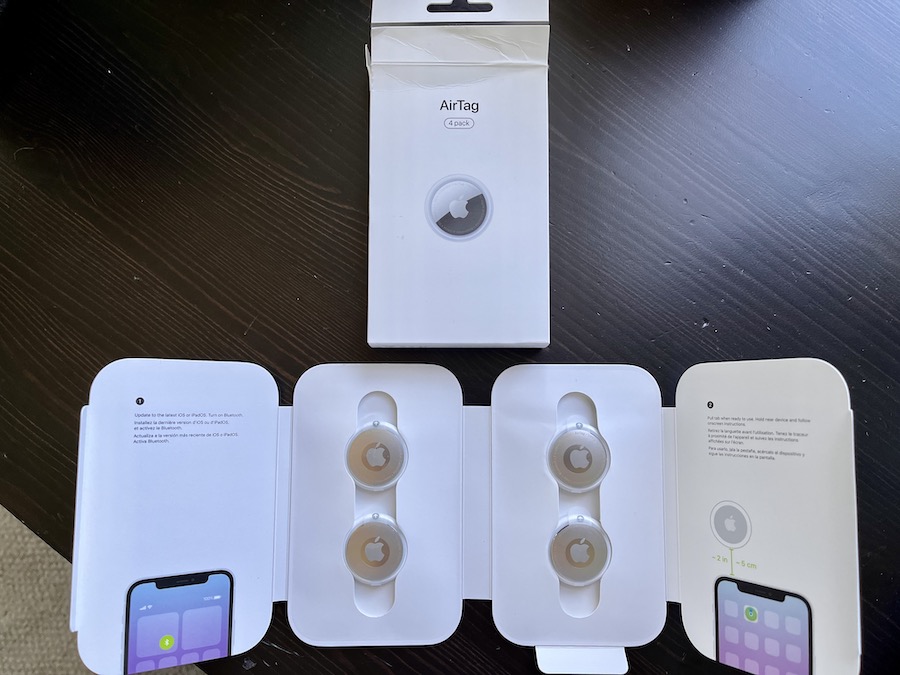
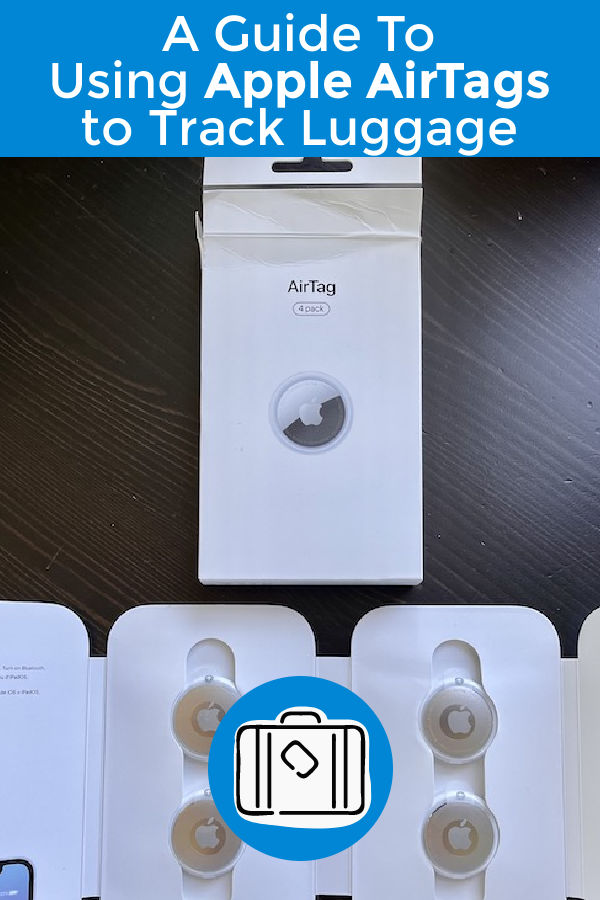
An AirTag holder will allow you to attach the AirTag to the item you want to track. We picked up this 4 pack of AirTag cases for less than $20 and they seem to work fine.
The AirTag is powered by a CR2032 battery that is replaceable. When your AirTag battery is running low, the iOS device paired with your AirTag will receive a notification.
What is the AirTag battery life? Depending on your usage, the battery should last up to a year.
Here’s Apple’s step-by-step instructions on how to replace your AirTag battery.
How do Apple AirTags work?
With almost 2 billion Apple devices around the world, the AirTag is constantly pinging off of all these devices. This gives Apple an almost-precise sense of where AirTags are located.
It’s similar to how the GPS location of your smartphone works. When location services are on, your smartphone constantly pings other devices around it. That information is the used by apps like Google Maps to show you your location.
Do AirTags work internationally? Yes. Depending on how many Apple devices are nearby, the location precision can vary. They will be less effective in remote areas, regardless of the country, and more accurate in cities where there are more Apple devices nearby.
Apple sends the GPS information about your paired AirTag to your own iOS device (iPhone or iPad) using the “Find My” app.
All you need to do is set up the “Find My” app on your phone and physically attach the AirTag to the item you want to track. To use “Find My” as a luggage tracker app, we’ll be hiding our AirTags inside our check in luggage.
Do Apple AirTags work with Android?
Simply: no. Don’t let other sites confuse you.
There is an Apple based app in the Google Play Store called Tracker Detect. Android users can use this app to detect nearby AirTags around them. This is meant to be a security tool.
You cannot pair an Apple AirTag to your Android device, whether as a tracker for luggage or any other purpose.
Apple AirTags work best with Apple iOS devices. If you don’t own an iPhone and are looking for luggage tracking devices, we suggest you look into Tile Trackers or the Samsung Smart Tags.
What Tech You Need to Use Apple Air Tags for Travel
Apple AirTags are sold individually or in a 4-pack. Once you’ve purchased an AirTag, Apple suggests that you upgrade to the latest version of iOS for your AirTags to work properly.
Shop for Apple AirTags and accessories at Staples >
AirTags only work with newer phone models, iPhone 6s or iPhone 6s Plus or newer, and must be running at least iOS 14.5.
If you’re not sure what iPhone you have or iOS version you are running, go to Settings —> General —> About. There you’ll be able to see your iPhone Model and current Software Version.
If you have a newer iPhone, you get an extra feature called “Precision Finding” which will locate and give you directions to your AirTag. To access this feature you’ll need a:
- iPhone 11, iPhone 11 Pro, or iPhone 11 Pro Max
- iPhone 12, iPhone 12 mini, iPhone 12 Pro, or iPhone 12 Pro Max
- iPhone 13, iPhone 13 mini, iPhone 13 Pro, or iPhone 13 Pro Max
- iPhone 14, iPhone 14 plus, iPhone 14 Pro, or iPhone 14 Pro Max
How To Set Up Apple AirTags With Your iOS Device
Once you’ve confirmed you have a compatible iPhone, running the latest iOS, and have an AirTag to pair, you’re ready to begin.
STEP 1: Pair Your AirTag to Your iPhone/iPad
Your AirTag will come nicely wrapped. We suggest not unwrapping until you’re ready to pair with a compatible iOS device.
When you’re ready, unwrap and notice you’ll be pulling out a last plastic part. Removing this plastic tab will activate your new AirTag and trigger it to connect with a nearby device.
Make sure the phone or device you’re pairing the AirTag with is not in “Airplane Mode” and has bluetooth turned on.
If you’re planning on pairing multiple AirTags to your device, we suggest going through this process multiple times and not all at once.
Bring the AirTag you want to pair close to the top of your phone/tablet and it should show up on your device’s screen.
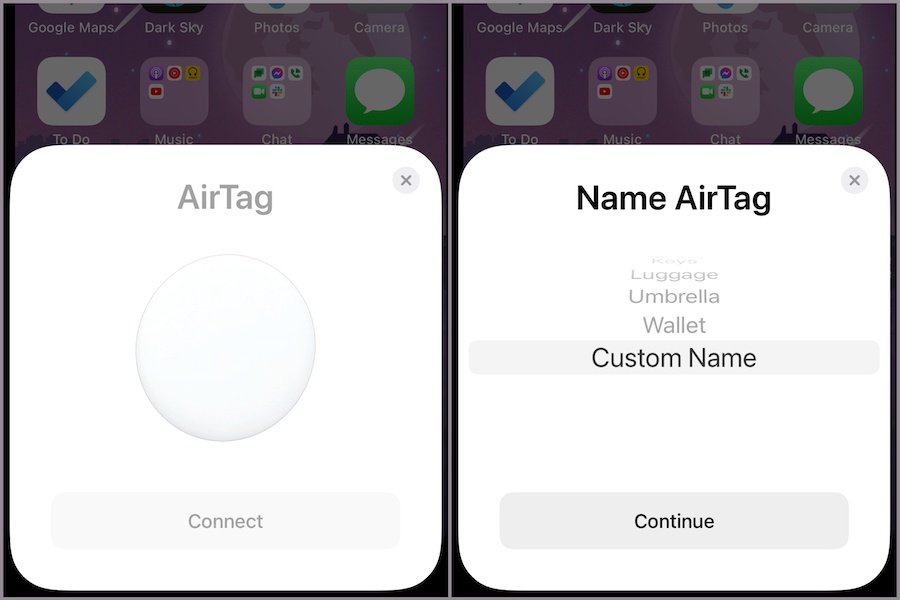
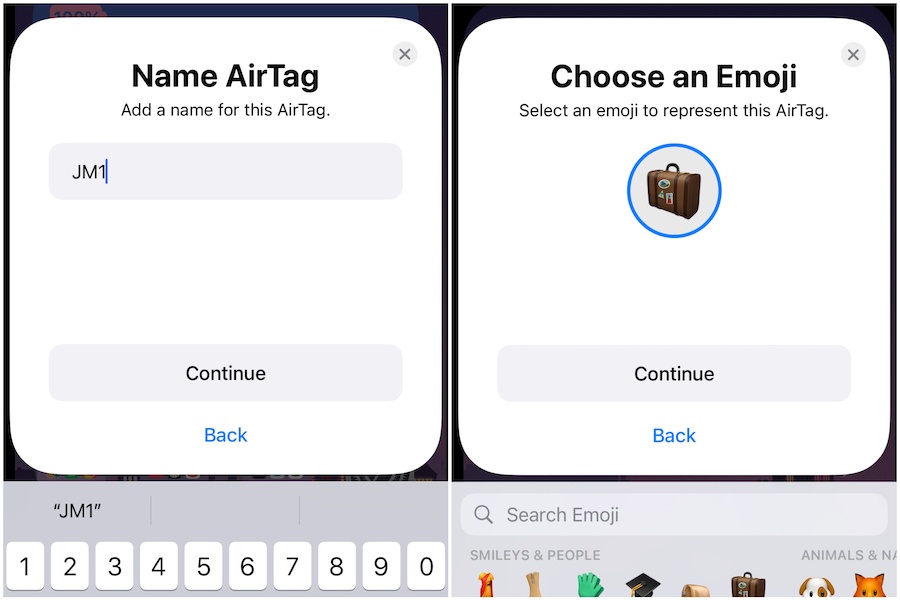
Click connect. You’ll be prompted to choose a name for your AirTag.
You can tell that Apple wants you to use one of their suggestions for the name because if you want to create your own name, you’ll have to scroll to the bottom and choose “Custom Name”. For those of you who like to be in control or have a non-listed item, this is for you.
You’ll then be asked to pick an Emoji symbol to represent your AirTag. This will be the icon shown on the map when you use the “Find My” app to track the AirTag.
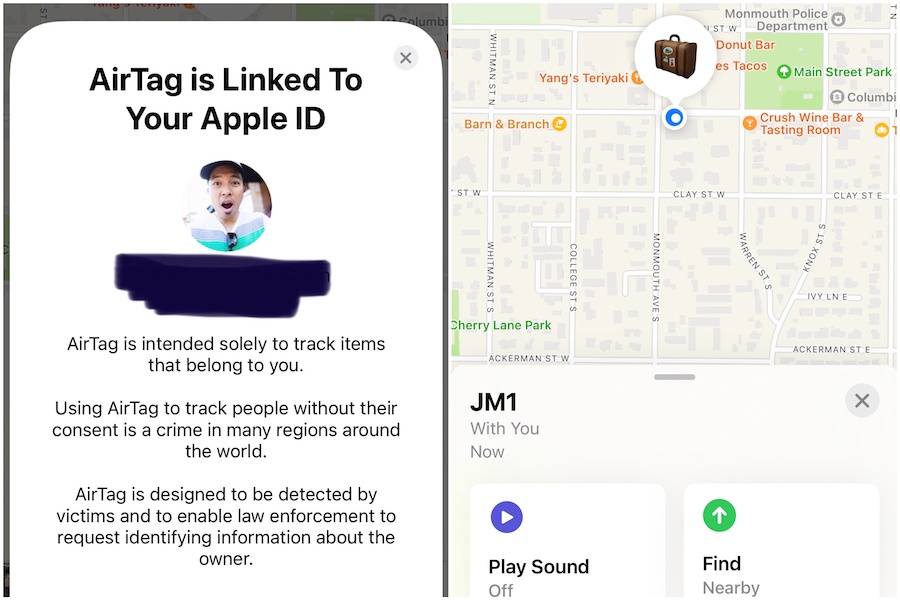
Once you’ve settled on a name, chose an emoji and hit “continue” a couple of times, you’ll arrive at the final step — Apple’s final notice. This final screen shows you that your AirTag is tied to your Apple ID and warns you about malicious use.
Once you’ve agreed that you’ve read everything, you’ll have officially completed the process. You will start to see your AirTag in the “Find My” app that automatically gets opened for you.
Find My App Luggage GPS Tracker
Note the menu options in the “Find My App”. You can see your custom named AirTag and where it’s currently located on the map. (It’s using Apple’s map, in case you were wondering why it doesn’t look like Google Maps).
You could select “Play Sound” in which your AirTag will start chirping. This is a helpful feature if you have your AirTag connected to keys or something like that. Probably not so helpful if it’s buried, hidden in a bag.
For newer iPhones, you can use the “Find” feature and if the stars align and everything connects properly, it will actually give you more detailed directions on how to find your AirTag. This will include how far you are away from it, etc…
To add additional AirTags to your Apple ID and iOS device, just repeat the steps above. As you see in the picture below, I now have 2 AirTags set up in my phone.
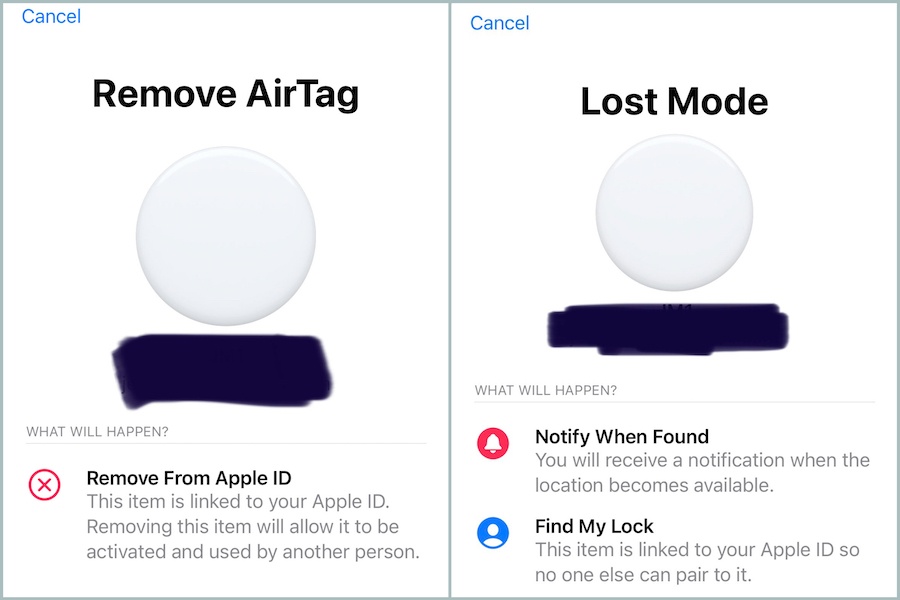
Swiping your finger up on the menu section, you’ll reveal more menu items such as “Notifications”, Lost Mode, and Rename/Remove:
![]()
![]()
- Remove AirTag: If you want to disassociate the AirTag to your Apple ID and device, tap this option. You can then pair the AirTag to another device or account. This is what you would do if you were giving or selling the AirTag to someone else.
- Lost Mode: If for some reason you can’t locate or connect to your Air Tag, use this mode. It will prevent anyone from claiming your AirTag as their own and will notify you if found.
What happens if you remove an AirTag using the app, but you had bluetooth off so that it wasn’t communicated to the AirTag? You can do a hard reset to make it like new again.
The hard reset ONLY works if the AirTag was removed from an Apple ID account using the “Find My” app. You’ll open the AirTag, remove it’s battery, and then put everything back together. The AirTag will act as if it’s new and ready to pair with a new device.
See Apple’s article for details on how to reset AirTags.
How to share your AirTag location with your airline
New in 2025, Apple has teamed up with airlines to incorporate AirTags into their luggage recovery systems via a new phone feature called Share Item Location.
Step one: open the Find My app on your iPhone, iPad, or Mac. Then go to the Items tab and select the AirTag or other lost item. Scroll down until you see ‘Share Item Location’.
Then follow the prompts to activate sharing and get a URL that can be shared with your airline.
Every participating airline has their own method for how you can share the link as part of their customer support system.
And once the luggage is returned to you, the tracking link gets automatically deactivated!
Our Test: Apple AirTag Luggage Tracking Review
To see if this actually works, we’ll put Apple AirTags in each of our checked luggage and track them as we travel.
- Oregon —> Montreal, Canada
- Montreal, Canada—> Frankfurt, Germany (connection) —> Florence, Italy
- Rome, Italy —> Istanbul, Turkey (connection) —> San Francisco, California
- Santa Ana/Orange, California —> Portland, Oregon (final destination)
As you can see, we have several connections on this itinerary so we’ll be tracking our bags as they change airlines and cross multiple borders.
Remember, we have no control whether or not our luggage will arrive where and when we want it. What we’re testing is if we can accurately track where our bags are at all times and if this helps with recovering them (if needed).
In the past, it was so stressful to check in with the airlines and have them tell us they had no idea where the bags where and when we would get them. We’re hoping that having more information will help alleviate some of the travel headaches we’ve dealt with before.
Real Life Test: Apple AirTag Luggage Tracking
So far, so good. We’re currently in Italy and I can say that the Air Tags not only work, but it truly gave us some peace of mind to know that our bags where with us.
Was it a perfect, stress-free experience? No. But they delivered on what they said they would and I have a feeling the experience will get better with future updates and technological advances.
Here’s what happened on one of our legs from Montreal –> Frankfurt –> Florence.
Find a spot to put your AirTags
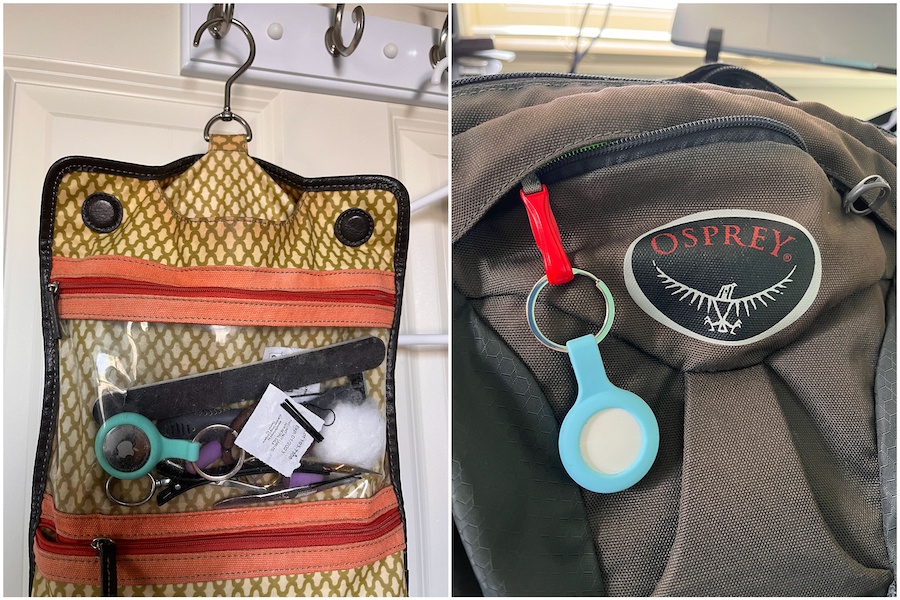
We placed our AirTags in non-obvious places. For Michelle’s bag, we placed the tag in her toiletry bag. For Jedd’s bag, we connected it to our Osprey day pack.
So each tag was in a bag, within our luggage. This didn’t seem to affect it’s connectivity.
Pro Tip: You can and should rename your AirTags each time you move them to a new bag or location. This will help with your tracking.
Dropping off your bags and the AirTag tracking begins
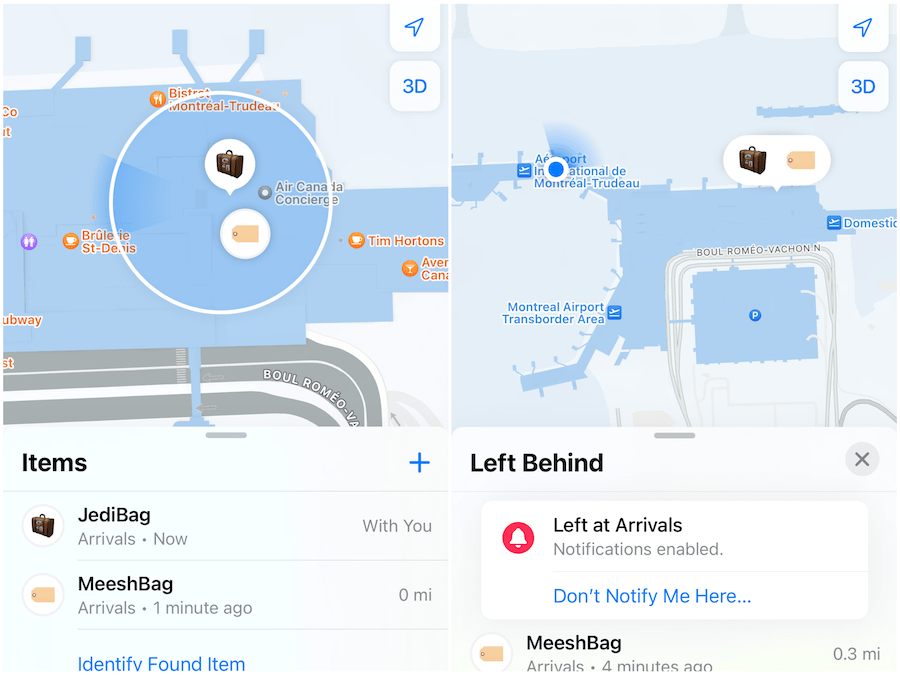
At the Air Canada check-in (left pic) you can see Apple knows our bags are with us using the “Find My” app and selecting “items” (where the AirTags are paired and information is stored).
The picture on the right showed us the location of our bags after we went through security. This seems typical as baggage goes to a holding area until it’s ready to be loaded onto a plane.
Since we were 4 hours early for our flight, this information didn’t change for awhile.
IMPORTANT NOTE #1: You must have WIFI or cellular connection and your AirTags must be near other Apple devices that are connected to WIFI or cellular for this to work well.
AirTags are not constantly connected via WIFI or cellular on their own so the accuracy and the immediacy of their location is limited.
This can easily cause some anxiety as you may want to immediately know where your AirTags/bags are. But if you know this information ahead of time, you can expect that you’ll get some kind of information about its location. To be honest, that’s WAY better than no information.
Since I knew we weren’t on a connecting flight and our plane was already in Canada, ready to take us to Frankfurt, I didn’t worry if my bags were with me or not. At least for this part.
TIP: We believe traveling abroad is much easier when our smartphone stays connected.
If you have our WorldWide Connectivity course (also available inside our Membership), review my tutorials on choosing an international phone plan and managing data usage so you can save money while enjoying smoother, safer trips.
Arriving at our First Destination AirTag Tracking is Slow
We arrived in Frankfurt and as soon as I was able to connect to a cellular network (thanks to T-mobile’s awesome international features), I opened the “find my app” and was prompted with error messages for about 10-15 minutes.
“We can’t connect to a server, try again”.
At some point, the app was working but here’s what it showed me:
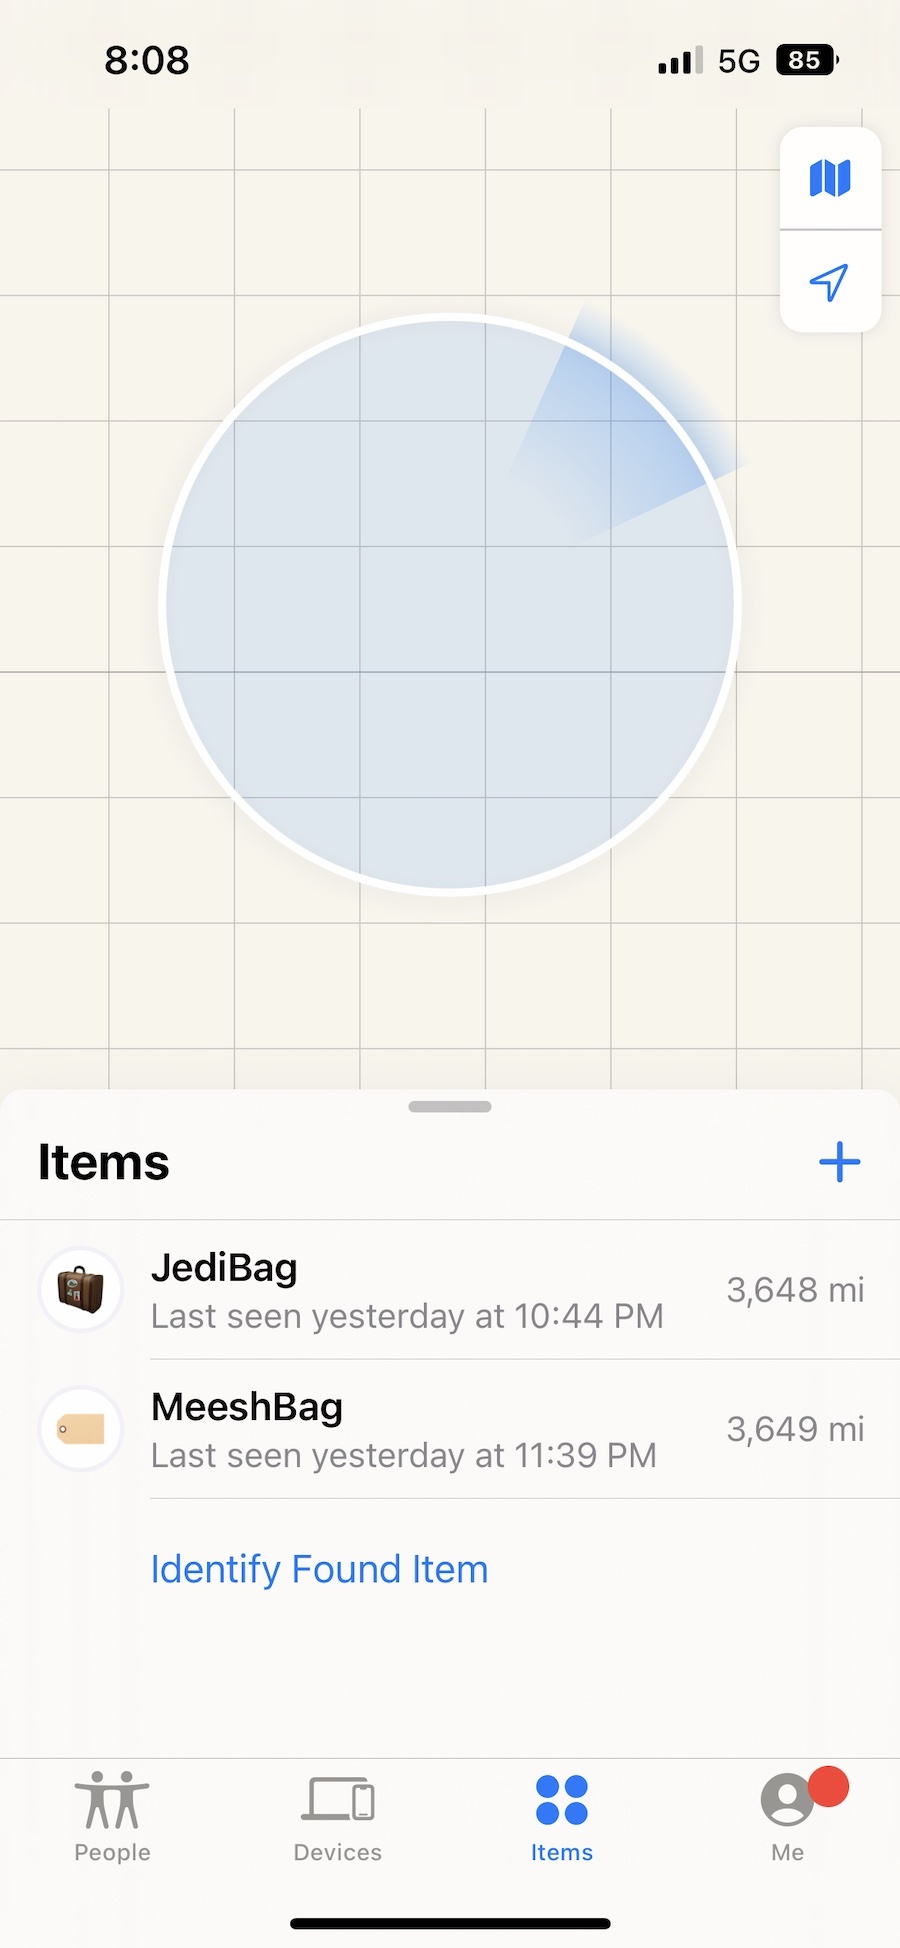
Not what you want to see when you first connect to the “Find My” app when you land at your destination. As you can see from above it seems that the bags were still in Montreal and not in Frankfurt. The blank location on the map was also disconcerting.
UPDATE (12/8/22): After using the AirTags several time, I discovered a pattern: Whenever you are at an airport, connect to a WIFI network to get the most accurate location reading for your AirTags.
A cellular data connection at the moment is not as reliable. Whenever I get a “Cannot connect to a server” error message, most of the time it’s fixed when I connect to a WIFI network and reopen the Find My app.
But here’s another important reminder:
IMPORTANT NOTE #2: Location accuracy takes more time than you think.
Remember AirTags need to be near iOS devices that are connected to WIFI or cellular. There’s a small chance that an AirTag can be picked up as soon as you’ve landed on a plane, but it’s unlikely to happen right away.
Seeing the initial image above, I wondered if our bags were still in Montreal, but I noticed a couple of things:
- The last time the Find My app had any information was 7 hours ago back at our departure city (Montreal). There was no NEW information to go off of.
- The map of where we currently where (Frankfurt) wasn’t loading yet, which means my phone was still collecting information.
In other words, I just had to wait a bit and trust. I checked back about 30 minutes later and here’s what I saw:
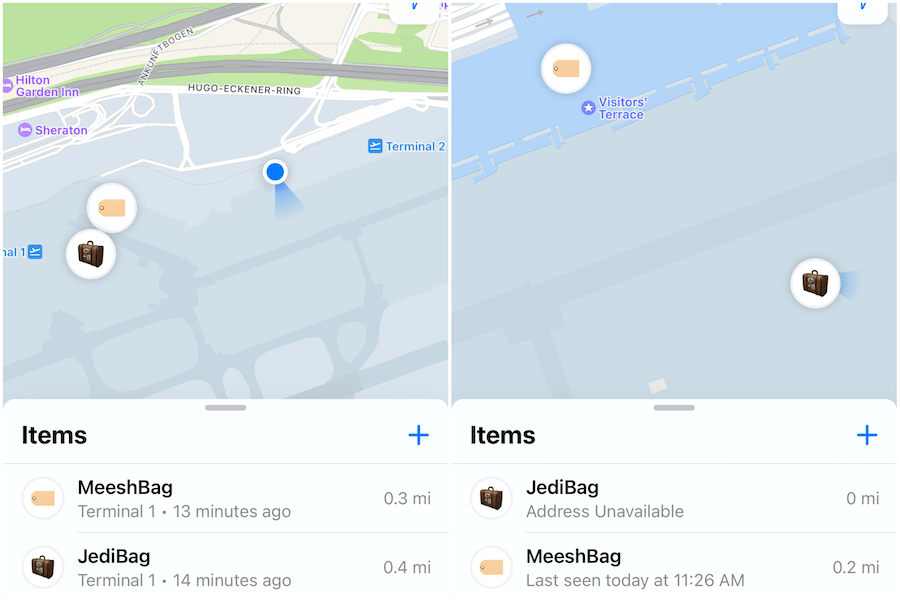
Our bags were with us in Frankfurt!!!
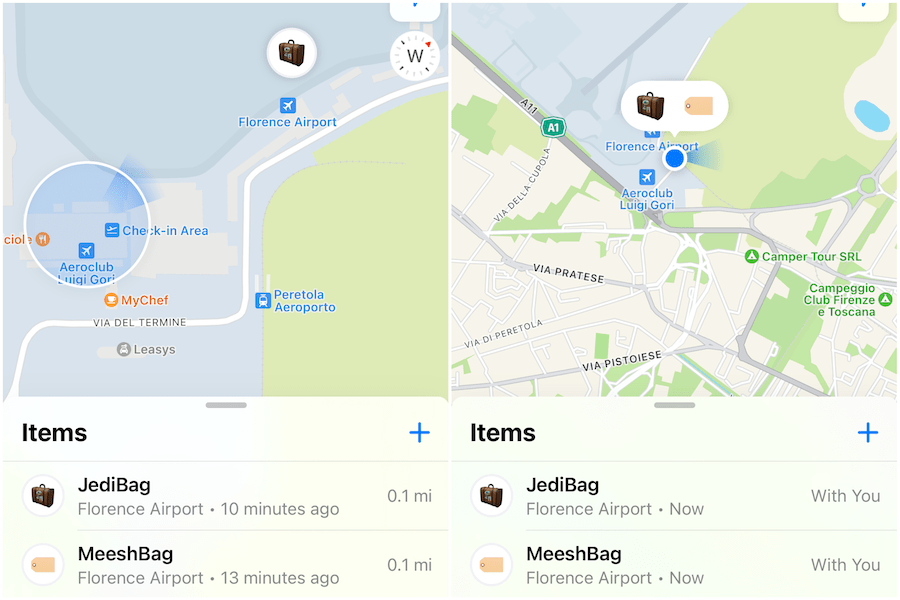
The picture on the left shows that our bags were in a different part of the airport (side note- Frankfurt’s airport is massive and confusing). The picture on the right was when we were about to depart.
This was both encouraging and concerning at the same time.
One bag was on the plane with us and the other was showing as being at the terminal. But again, I saw that the last time the bag pinged was over an hour ago so I just trusted that both bags were with us on our plane to Florence.
We landed in Florence and this time, I waited for about 15-20 minutes after we landed, connected to the airport’s WIFI and then opened the “Find My” app.
The bags were with us in Florence!
The picture on the left shows that we were in the baggage claim and waiting for our bags. I took the picture on the right as soon as we got our bags.
IMPORTANT NOTE #3: AirTags provide SOME relief but are not perfect for keeping track of things when traveling.
It’s important to remember that AirTags provide more information than you used to have, but there’s some quirks. You need patience.
You need to discern some of the information you’re receiving. You (and your AirTags) need some sort of WIFI or cellular connection. But once you remember these things, you realize it’s pretty neat that you can truly, sort of, track your luggage.
If our bags had been left at any of the airports, we would have known and we could then make plans. We could have provided information to the airport staff. I have no doubt that this will probably happen at some point.
Who should use AirTags for Travel
- Anyone that has an iPhone and wants some information about where their bags/items are.
- People that have to check in their bags when they travel.
Who should avoid using AirTags for Travel
- Anyone that has a non Apple phone, but there are other options like Tile or Samsung tags.
- Those that don’t care if their bags arrive or not.
- Team carry on.
We hope our Apple AirTag guide and review is helpful, whether you’re looking for luggage tracking devices or want to learn how to use Air Tags for travel.
Do you have a lost luggage story or a travel packing tip? We want to hear it. Let us know in the comments below.
Read next:
How to choose the best travel bag for your trip
Digital Nomad tech gear packing essentials
Simple Tech Tips for Travelers Who Didn’t Grow Up With Smartphones
Like this post? Pin it for later or share with friends!


Is the AirTag put inside the luggage or attached to the exterior like a luggage tag????
Would be very, very helpful to include a photo of placement of AirTag.
Thanks for your question. The AirTag is hidden inside the luggage, to avoid getting stolen or damaged. We’ll be sure to add this to our post shortly.